
Troubleshooting capacitive touch springs starts with a simple check: if they are unresponsive, the most common fix is to clean the contact points and ensure proper alignment. The top three causes are dirt, corrosion, and misalignment. More complex issues like EMI interference or calibration loss may also be at play.
This step-by-step guide covers troubleshooting capacitive touch springs, including SMT metal plate touch springs and metal-plate SMT capacitive touch springs, from simple cleaning with isopropyl alcohol to advanced testing with a multimeter. Most fixes take under 15 minutes and require basic tools. First, start by inspecting for visible dirt or corrosion. Then adjust the spring's tension. Use a multimeter for continuity testing. These steps cover most cases. You can restore responsiveness quickly without special equipment.
Key Takeaways
-
Clean the spring and pad with isopropyl alcohol to remove dirt and oxidation. This simple step fixes most unresponsive touch controls.
-
Adjust the spring's alignment and tension with tweezers. A perpendicular spring with proper force ensures reliable contact.
-
Use a multimeter to test continuity. Replace the spring if the test fails after cleaning.
-
Shield against electromagnetic interference with proper grounding and insulation. This prevents false triggers and dead zones.
-
Perform regular cleaning every three to six months. Preventive maintenance keeps touch controls responsive.
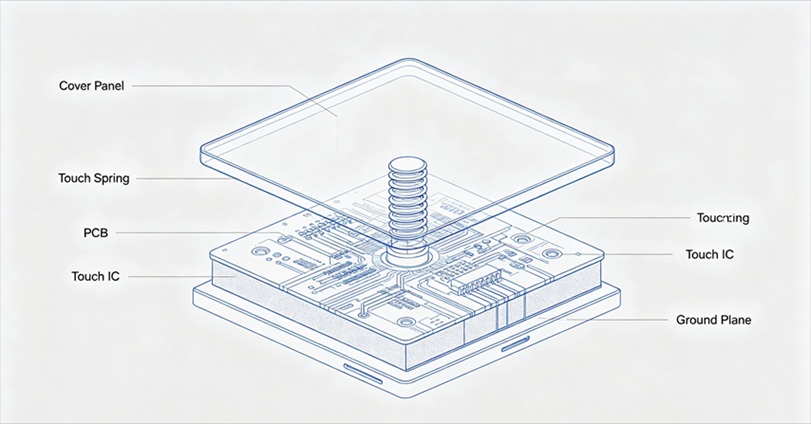
Troubleshooting Capacitive Touch Springs: Initial Checks
Before you reach for cleaning supplies, perform two quick checks. These initial steps for troubleshooting capacitive touch springs often reveal the root cause. They save you time. You might discover a simple physical issue or a power-related problem. Follow this process to diagnose the issue accurately.
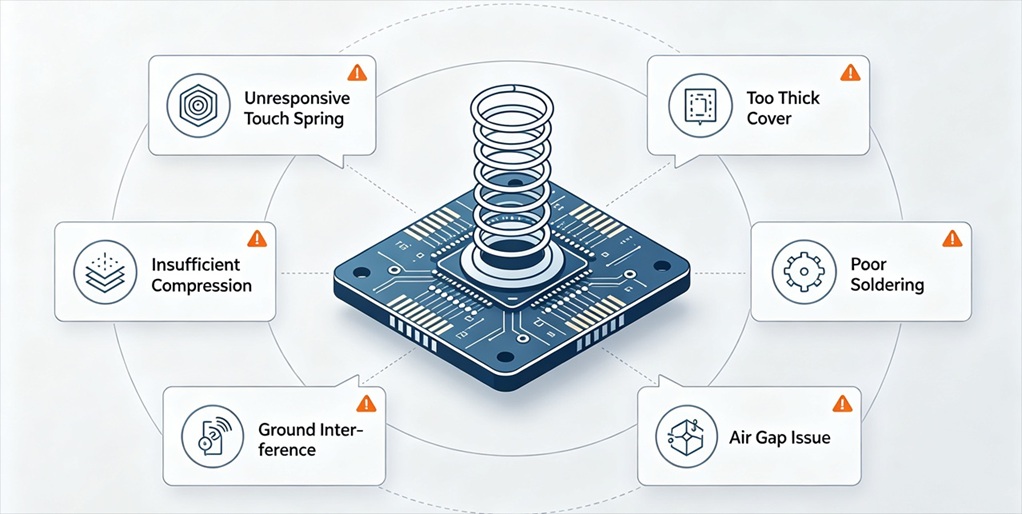
Inspect for Physical Damage
Start with a thorough visual inspection. Examine the capacitive switch for physical damage. Look for cracks, scratches, or wear on the electrodes. Focus on the electrodes and surrounding areas. Contaminants or abnormalities in these regions can impair performance. You need to detect any issues before proceeding.
Compare your spring with a known-good SMT metal plate touch spring from Goodkey. This comparison helps you spot deformities. Look for bending, rust, or breakage. A deformed spring loses proper contact with the PCB pad.
Document your findings. Use a magnifying glass. Rust and oxidation count as physical damage. These problems require cleaning or replacement. Check for bent coils. A single bent coil changes the spring's height. This affects contact force. Physical inspection takes two minutes.
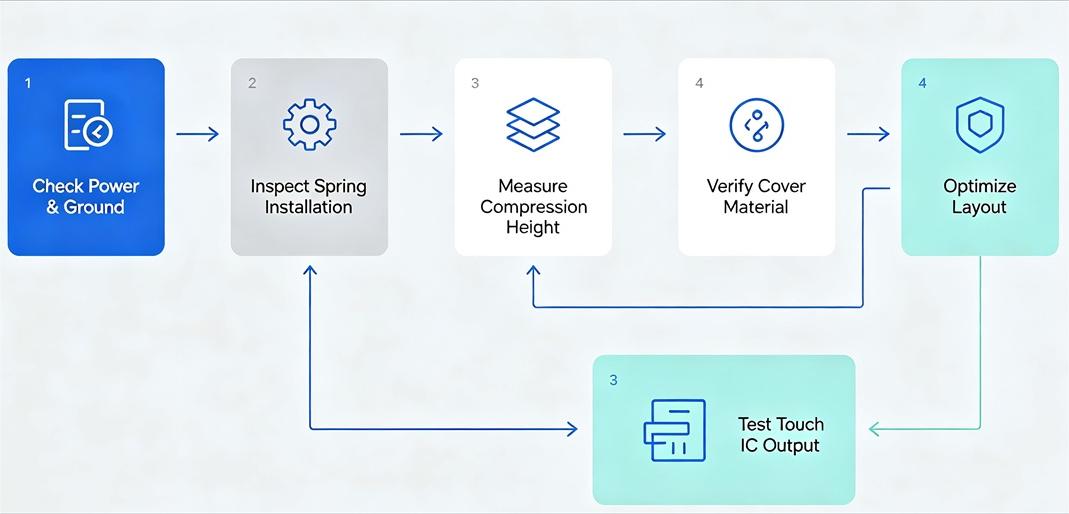
Verify Power and Grounding
Confirm the device connects to a functional power source. Use a multimeter to measure voltage or continuity. Set the multimeter to the appropriate range. Touch the probes to the power input terminals. You should see the expected voltage reading. Check the battery charge if your device runs on batteries. Adequate power must reach the touch controller. Without it, the switch cannot operate correctly.
Grounding issues cause erratic behavior. A floating ground creates false triggers or dead zones. The touch controller needs a stable reference point. Ensure the grounding path remains intact. You can test continuity between the ground plane and the power supply. A broken ground path causes intermittent failures. This verification step ensures stable touch detection for a metal-plate SMT capacitive touch spring system. Proper grounding prevents many common issues.
Following these initial checks puts you on the right track for troubleshooting capacitive touch springs. You can rule out common causes quickly. You then move to the cleaning and alignment steps. These two checks take under five minutes. They require only a multimeter and your eyes.
Clean Contact Points
Dirt and oxidation rank as the primary culprits behind unresponsive touch controls. You must clean the contact points thoroughly before considering any replacement parts. This process applies equally to a metal-plate SMT capacitive touch spring and traditional spring designs. The cleaning procedure takes about five minutes and requires only basic supplies you likely already own.
Remove Dirt and Oxidation
Start by powering down the device completely. You need to prevent any electrical activity during cleaning. For daily maintenance, use a dry microfiber cloth to wipe away fingerprints and dust. Move the cloth in circular motions across the spring and the PCB pad. This routine removes surface-level grime without introducing moisture.
For deeper cleaning, prepare a 1:1 solution of distilled water and isopropyl alcohol. You can also use a manufacturer-approved cleaner if you have one on hand. Dampen the microfiber cloth with this solution. Never spray the liquid directly onto the components. Spraying forces moisture into crevices and can damage sensitive electronics. Wipe the spring and pad systematically, paying close attention to corners and edges where residue accumulates.
Corrosion requires a different approach. Use a pencil eraser to gently rub the oxidized areas. The eraser's abrasive texture lifts oxidation without scratching the metal surface. After rubbing, wipe the area clean with your alcohol-dampened cloth. This two-step method removes both the corrosion and the debris it creates.
You must avoid certain materials during this process. Paper towels leave lint behind. Rough fabrics scratch the spring surface. Abrasive pads remove the protective coating. Ammonia-based household cleaners react with metals and cause further damage. Excessive pressure bends the spring and alters its tension. Use only gentle, deliberate motions.
For medical or industrial environments, you need stronger solutions. EPA-approved disinfectants designed for electronics work well in these settings. Anti-static solutions help in dusty environments by reducing particle attraction. Increase your cleaning frequency in these demanding conditions. A monthly deep clean keeps the SMT metal plate touch springs functioning reliably.
Dry and Reassemble
Moisture causes more problems than dirt ever will. You must let all components dry completely before reassembly. Residual moisture creates short circuits and false triggers. These issues mimic the symptoms you are trying to fix.
Allow at least ten minutes of air drying after cleaning. Place the components on a clean, dry surface. You can speed up the process with a lint-free cloth, but never use heat. Heat damages the spring's temper and the PCB's solder joints. A compressed air duster works well for reaching tight spaces between coils.
Check each component visually before reassembly. The spring should appear clean and bright. The PCB pad should show no residue or discoloration. If you still see oxidation, repeat the cleaning process. One thorough pass beats several rushed attempts.
Reassemble the device only after you confirm complete dryness. This troubleshooting capacitive touch springs step prevents many recurring issues. Proper drying ensures the cleaning actually solves the problem rather than creating new ones. You will notice improved responsiveness immediately after reassembly.
The entire cleaning process takes under fifteen minutes. You need only a microfiber cloth, isopropyl alcohol, and a pencil eraser. These supplies cost little and last through many cleaning sessions. Regular cleaning prevents the buildup that causes unresponsive touch controls in the first place.
Adjust Spring Tension and Alignment
Misalignment and improper tension cause many unresponsive touch issues. A spring that sits at an angle or lacks sufficient downward force cannot maintain reliable contact with the PCB pad. This problem affects both traditional springs and metal-plate SMT capacitive touch spring designs. You can correct these issues with simple tools and careful adjustments.
Realign the Spring on the PCB
Start by examining the spring's position on the circuit board. The spring must sit perpendicular to the pad and remain centered over the contact area. An angled spring reduces the contact surface area. This reduction weakens the electrical connection and creates intermittent failures.
Use a pair of tweezers to adjust the spring's position. Gently grip the base of the spring near the solder joint. Apply light pressure to straighten the spring until it stands upright. Work slowly and deliberately. Sudden movements can bend the coil or damage the solder connection.
Compare the spring's angle with neighboring springs on the same board. This comparison helps you identify the correct perpendicular position. A visual reference makes the adjustment easier and more accurate. You can also use a small square or ruler to check the angle.
Check the spring's centering on the pad. The spring base should cover the entire pad surface. An off-center spring creates uneven pressure distribution. This unevenness leads to weak signals and dead zones. Adjust the position until the base aligns perfectly with the pad outline.
Avoid over-stressing the metal during adjustment. Repeated bending weakens the spring's structure. Each bend creates microscopic stress points. These stress points eventually cause fractures. Make one careful adjustment rather than several rushed attempts.
After realigning, test the spring's response. Touch the pad and observe the device's reaction. If responsiveness improves, proceed to tension adjustment. If not, continue with the tension modification steps below. This realignment process works for both standard springs and SMT metal plate touch springs.
Modify Tension for Better Contact
Spring tension determines the downward force on the PCB pad. Too little force results in poor electrical contact. Too much force can damage the pad or cause false triggers. You need to find the right balance for reliable operation.
Test the current tension first. Press the spring gently with a non-conductive tool. Observe how much resistance you feel. A spring that compresses too easily lacks sufficient tension. A spring that barely moves may have excessive tension.
For a loose spring, carefully stretch it to increase downward force. Grip the top coil with tweezers. Pull upward with steady, even pressure. Extend the spring by a small amount, roughly one millimeter or less. Test the response after each adjustment. This incremental approach prevents over-stretching.
For a spring that feels too stiff, you may need to compress it slightly. Place the spring on a flat surface. Press down gently with a flat tool. Reduce the height by a small amount. Test the response again. The goal is consistent contact without excessive pressure.
Each adjustment changes the spring's characteristics. Document your changes and test after every modification. This systematic approach helps you track what works. You avoid making random changes that compound problems.
The spring material affects how much adjustment it tolerates. Stainless steel springs handle moderate bending without losing their temper. Other materials may weaken more quickly. If you notice the spring becoming soft or losing its shape, stop adjusting. Replace the spring instead.
Proper tension ensures reliable contact for your metal-plate SMT capacitive touch spring system. The spring must maintain consistent pressure through temperature changes and vibration. A well-adjusted spring provides years of trouble-free operation.
These alignment and tension adjustments complete the mechanical fixes for troubleshooting capacitive touch springs. You have now addressed the physical causes of unresponsiveness. The next section covers environmental and electrical interference factors that may still affect performance.
Address Environmental and Electrical Interference
Capacitive touch sensing responds to electric fields, making it vulnerable to electromagnetic interference (EMI). Traces and springs act as antennae, picking up noise from nearby circuits. This noise causes false triggers or dead zones. You must address these environmental factors during troubleshooting capacitive touch springs.
Shield Against EMI
Several shielding methods protect touch circuits from interference. The table below summarizes common approaches:
|
Shielding Method |
Description |
|---|---|
|
Driven Shield |
A shield electrode adjacent to the sense electrode, driven with a similar signal, reduces stray capacitance. |
|
Frontal Shield |
A peripheral shield controls capacitance between the touch surface and the shield. |
|
Guard Ring |
Grounded conductors surrounding sensitive traces intercept stray electric fields. |
|
Multi-Layer PCB |
Internal ground planes provide continuous shielding between signal layers. |
|
Star Grounding |
A single-point ground reference prevents ground loops and circulating currents. |
Follow specific installation practices. Place touch-related components inside a dedicated shield can. Maintain at least 20 mm clearance from top antennas and 10 mm from bottom antennas to the touch IC. Add ground traces at least 0.2 mm wide between driver and sensor traces.
On flexible printed circuits, use copper pour with 0.3 mm spacing and 0.1 mm track on unrouted areas. Provide at least two ground traces between the FPC and main board. These measures reduce noise coupling for your metal-plate SMT capacitive touch spring system.
Check Mounting and Insulation
The mounting distance between the spring and the front panel affects sensitivity. The spring compensates for distance variations, maintaining electrical contact even on curved surfaces. However, the effective contact area where the spring presses against the panel matters most. A smaller contact area reduces touch sensitivity, just as a smaller sensor pad diameter would. Ensure the spring presses firmly with adequate surface contact.
Insulation also plays a critical role. The spring must remain electrically isolated from other conductive components. Check for unintended contact with metal housings or brackets. Verify that insulating spacers or films remain intact.
Damaged insulation creates stray capacitance paths that interfere with sensing. Proper spacing prevents false readings and dead zones. These checks apply equally to SMT metal plate touch springs and traditional designs.
These checks complete the interference-related fixes. You have addressed both electrical noise and mechanical mounting factors.
Test and Replace Components
When cleaning and adjustment fail to restore responsiveness, you need to test the components directly. This step confirms whether the spring itself has failed. You can then decide between repair and replacement. The process takes about ten minutes with basic tools.
Use a Multimeter for Continuity
Start with safety. Power down the device completely. Disconnect all power sources. Discharge bulk capacitors with a bleed resistor for capacitive circuits. Wear an ESD wrist strap to protect sensitive components. Never test continuity on a live circuit.
Remove the switch from the PCB if possible. This step isolates the component for accurate testing. Set your multimeter to continuity mode. You should hear an audible beep when the circuit completes. Probe the two active terminals. For SPST-NO tactile switches, these terminals are typically the two pins on one side of the housing.
Test the switch in both states. When unpressed, expect an 'OL' reading or infinite resistance. Any reading below 1 MΩ indicates leakage. This leakage causes false triggers or weak signals. When pressed firmly, expect a beep with resistance near 0Ω. A reading above 5Ω indicates high contact resistance. This resistance weakens the signal reaching the touch controller.
Repeat the test 10–20 times. This repetition catches intermittent failures. A spring that passes once may fail on the tenth press. Document each reading. Consistent high resistance points to corrosion inside the spring. Inconsistent readings suggest a mechanical issue like a bent coil.
Replace with a Compatible Spring
If the continuity test confirms a broken connection, replacement becomes necessary. Cleaning cannot fix a fractured spring. Order a compatible Goodkey spring for reliable performance. Match the original dimensions and material exactly. Stainless steel springs offer the best durability and corrosion resistance.
Measure the original spring's height, diameter, and wire thickness. Compare these measurements with the replacement part. A spring that differs by even a millimeter may not fit properly. Check the coil count as well. Different coil counts change the spring's compression characteristics.
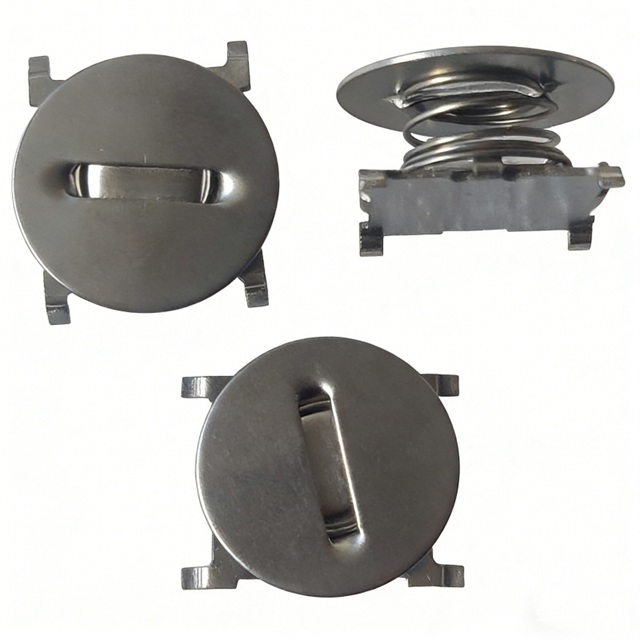
Consider upgrading to a metal-plate SMT capacitive touch spring design. These components integrate the spring with a mounting plate. The plate provides stable positioning on the PCB. This design reduces alignment issues during assembly. Many technicians find these easier to install than loose springs.
SMT metal plate touch springs also offer consistent tension across the entire contact area. The plate distributes force evenly. This distribution prevents the uneven wear that causes premature failure. You may find these components solve recurring problems with standard springs.
Install the new spring carefully. Ensure it sits perpendicular to the pad. Verify proper alignment before soldering. Test the connection immediately after installation. A successful replacement restores full touch responsiveness.
You can resolve most unresponsive touch springs by diagnosing, cleaning, and adjusting them. Start with a visual inspection. Clean contact points with isopropyl alcohol. Realign the spring on the PCB. Address environmental interference when problems persist. Test components with a multimeter to confirm full functionality. Simple cleaning and proper alignment typically restore responsiveness within minutes.
Persistent issues may require replacing a worn metal-plate SMT capacitive touch spring or adjusting board layout spacing. Preventive maintenance keeps your controls working reliably. Store devices in dry, dust-free environments. Inspect SMT metal plate touch springs periodically for signs of wear. Early detection prevents unexpected failures.
For durable, precision-made springs, trust Goodkey to keep your touch controls responsive.
FAQ
How often should I clean my capacitive touch springs?
Clean your touch springs every three to six months for normal environments. Increase frequency to monthly in dusty or humid conditions. Routine cleaning prevents dirt buildup and oxidation before they cause unresponsive behavior. A quick wipe with isopropyl alcohol takes under five minutes and extends component life significantly.
Can isopropyl alcohol damage my touch springs?
No, 90% or higher isopropyl alcohol is safe for metal springs and PCB surfaces. It evaporates quickly without leaving residue. Ensure you let components dry completely before reassembly. Avoid lower concentrations that contain more water, which can promote corrosion over time.
When should I replace a spring instead of cleaning it?
Replace a spring when you see visible rust, cracks, or permanent bending. A multimeter continuity test that fails after cleaning confirms internal damage. Also replace springs that have lost their tension and no longer press firmly against the pad. A metal-plate SMT capacitive touch spring offers better durability than loose springs.
Why does my touch work intermittently?
Intermittent touch response usually points to loose spring tension or partial oxidation. Check alignment first, then clean contact points thoroughly. If problems persist, test continuity while pressing the spring repeatedly. Inconsistent readings indicate a failing connection that needs replacement. Environmental EMI can also cause sporadic behavior.
Are SMT metal plate touch springs better than traditional springs?
Yes, SMT metal plate touch springs provide more stable positioning on the PCB. The integrated plate distributes force evenly across the contact area. This design reduces alignment issues during assembly and maintains consistent tension over time. Many technicians prefer them for applications requiring reliable long-term performance.